Editing Articles
The editor is where you spend most of your time in Grafida. It opens when you click any row in the Articles view, or when you press New article.
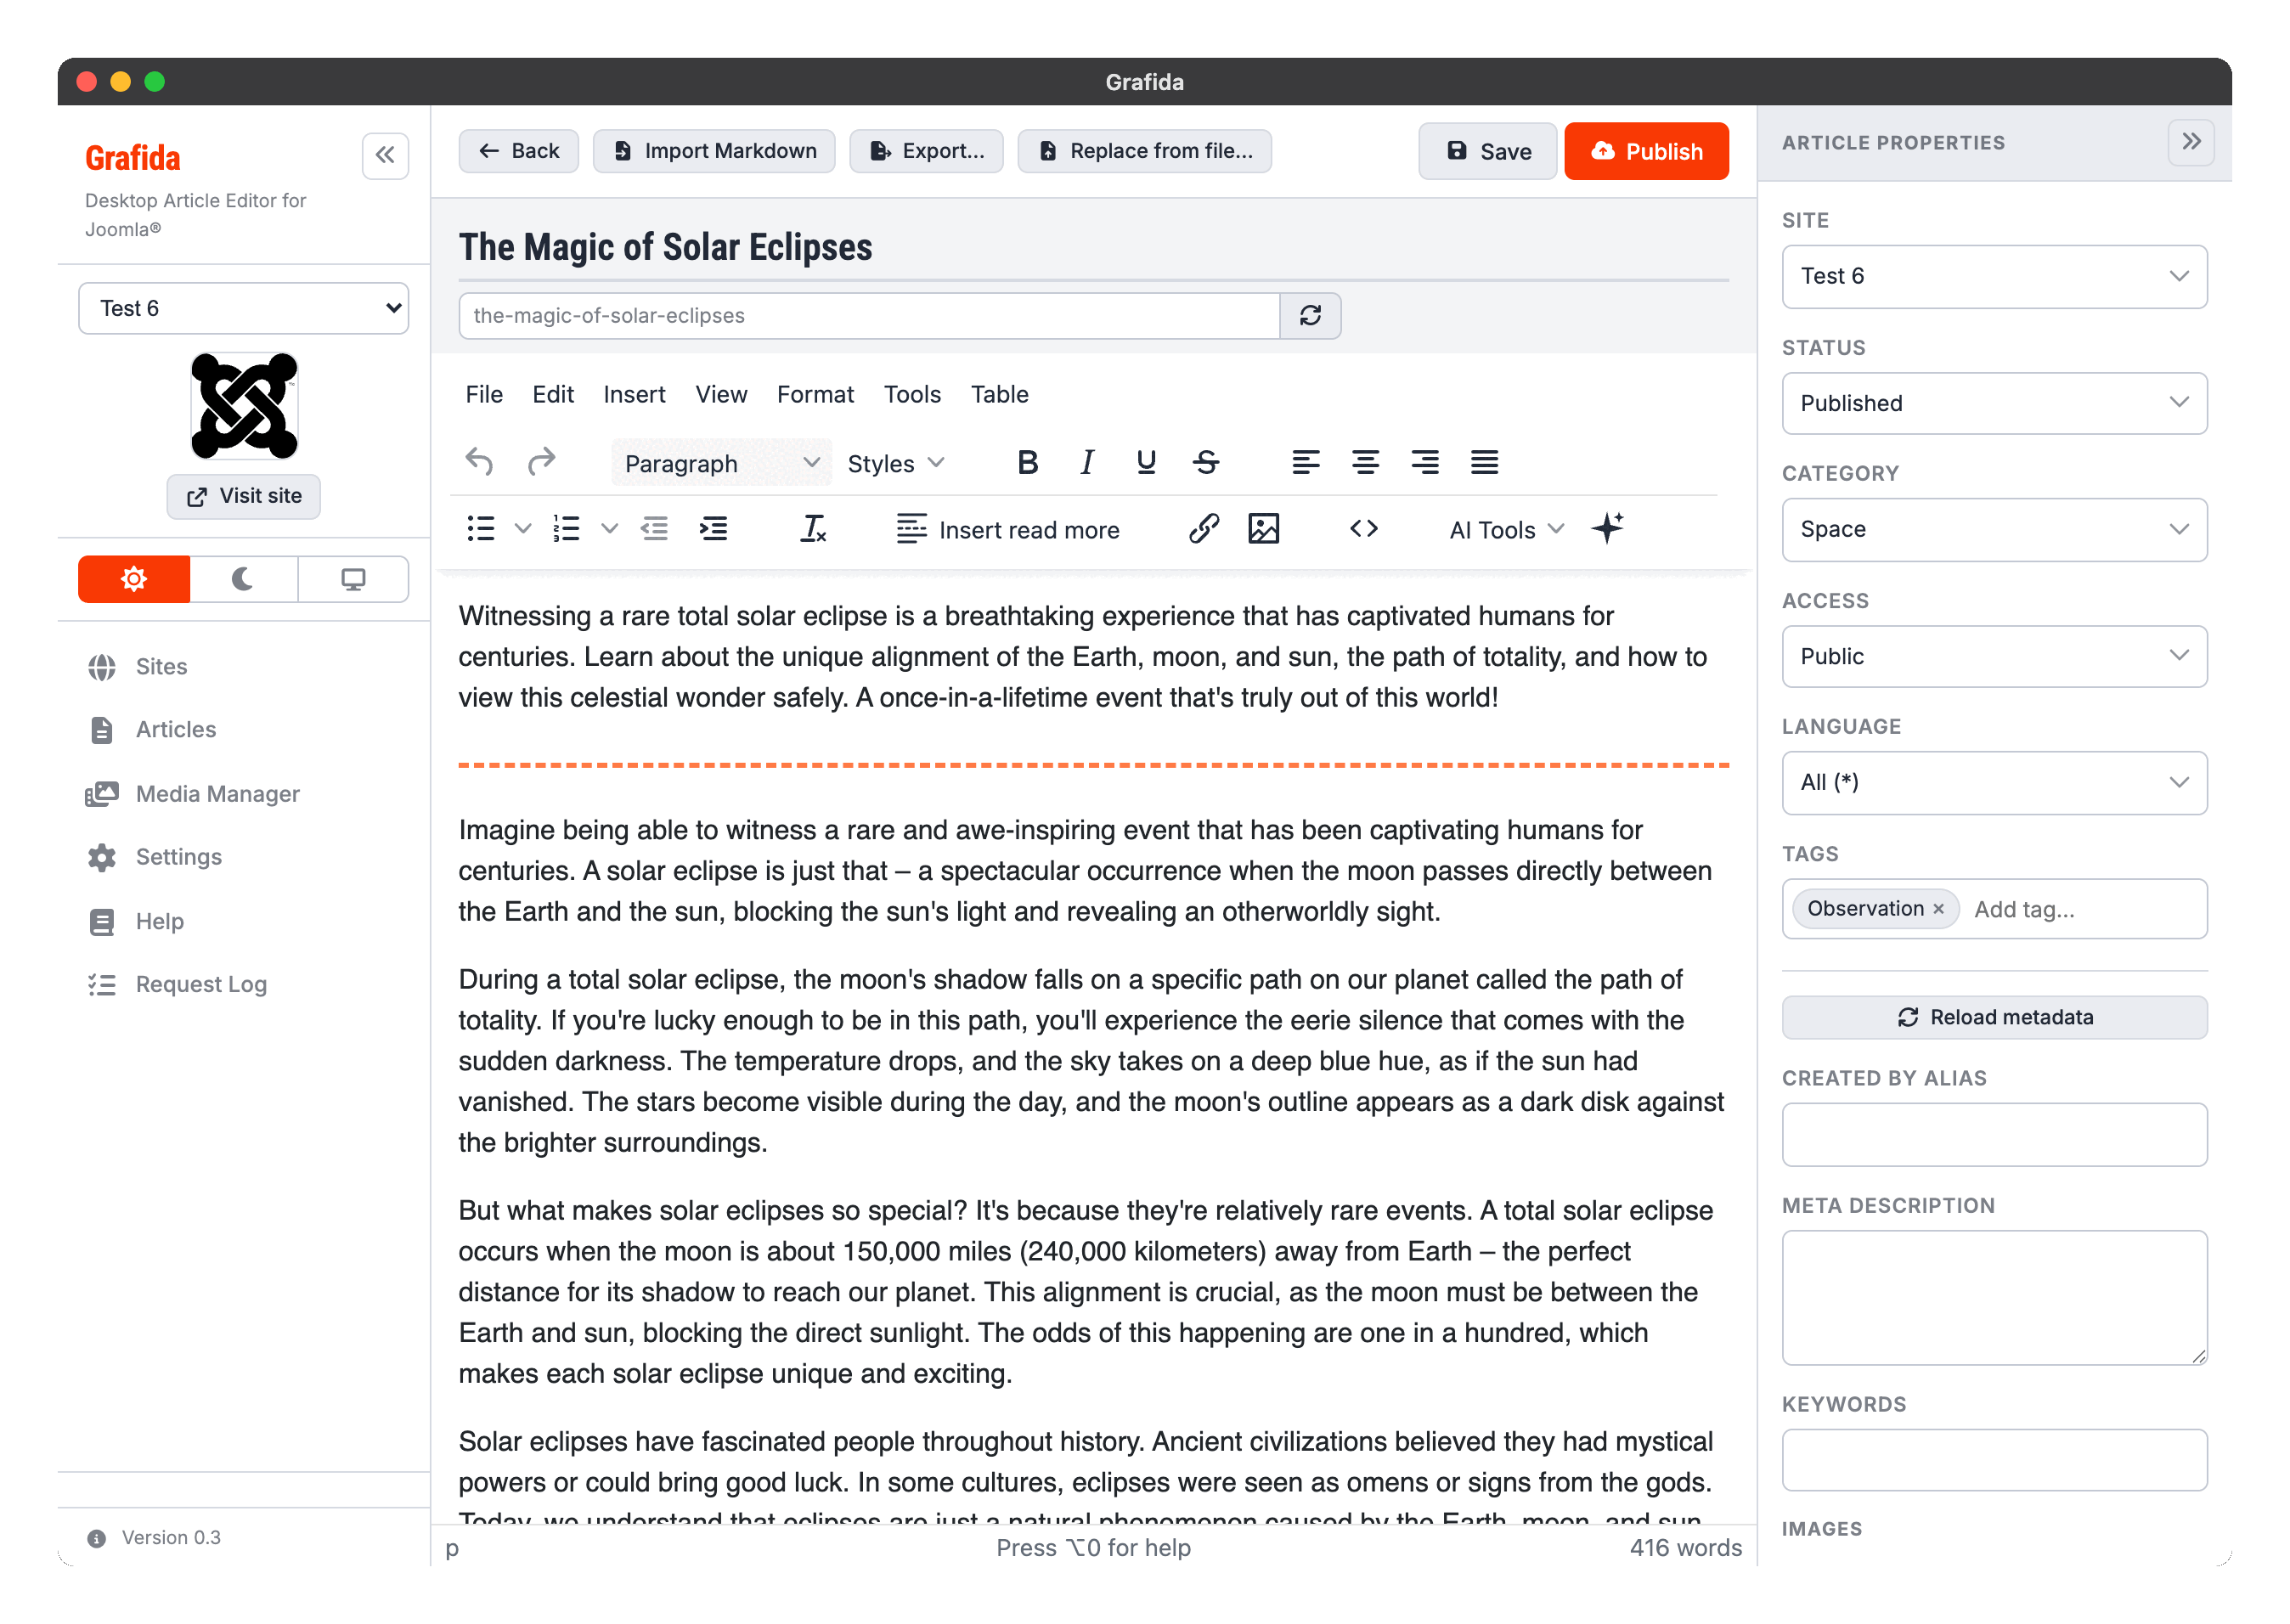
The screen has three parts: the toolbar across the top, the editor itself in the middle,
and the Article properties sidebar on the right. The properties sidebar can be collapsed with
the » button in its header when you want the full width for writing.
The toolbar
Back returns to the Articles view. If you have unsaved changes you are offered the chance to save them first.
Import Markdown replaces the article body with a Markdown file converted to HTML. This is meant for the case where you drafted something in a Markdown editor and want to finish it in Grafida.
Export… writes the whole local article to a .grafida file — see
Moving an article between computers below.
Replace from file… does the opposite: it overwrites the article you have open with the contents
of a .grafida file, while keeping its link to the site and to the remote article. You are asked
to confirm, and the article is saved before it is overwritten.
Save stores the article in Grafida's local database. Nothing is sent to your site.
Publish sends the article to your site. See Publishing below.
Tip
Ctrl + S (Windows, Linux) or Cmd + S (macOS) saves the local article from anywhere in the editor.
Title and alias
The large field at the top is the article title. Below it is the alias: the last part of the article's URL on your site.
Leave the alias empty and Grafida fills it in from the title when you move focus out of the title field. It never overwrites an alias you typed yourself; use the circular-arrows button next to the field to regenerate it deliberately.
The alias Grafida shows is a faithful preview of what Joomla will produce, including the
site-specific difference: on a site with Unicode aliases switched on in Global Configuration, a
Greek title yields a Greek alias, while a site using the default transliterating behaviour turns
the same title into Latin characters — or, if nothing survives, into a date-and-time stamp. How the
title is transliterated depends on the article's Language, so Grüße becomes gruesse in a
German article and Καλημέρα becomes kalimera in a Greek one. See
Aliases and transliteration.
Writing
The editing area is TinyMCE, the same editor Joomla ships with, so the menus and the toolbar will be familiar. A few things are specific to Grafida.
Styles
The Styles drop-down applies a CSS class to your selection, exactly as Joomla's editor does.
The list of classes is read from your site's editor.css, so what you see here is what your own
template offers, plus a small set of common fall-backs.
Select some text and pick a style and the selection is wrapped in a <span> carrying that class.
Put the cursor in a paragraph without selecting anything and the class is applied to the whole
paragraph instead.
Read more
Insert read more puts Joomla's read-more separator at the cursor. Everything above it becomes the article's intro text — what Joomla shows in blog and category listings — and everything below it becomes the full text.
You can only have one separator per article, which is also Joomla's rule.
Slash commands
Type / on an empty line and a filterable menu of common insertions appears: headings, lists,
inline code, a preformatted block, dummy text, a quotation, the read-more separator, images, a
link, a table, the source code editor and full-screen mode. Keep typing to filter, press
Enter to insert the highlighted item. Inline code format and Preformatted block
appear immediately below Ordered list.
The filter matches the English keyword as well as the translated label, so /head finds the
headings even when you are running Grafida in another language.
This is switched on by default; you can turn it off in Settings.
Markdown code syntax
Grafida recognises the two common Markdown spellings for code while you type:
- Wrap text in single backticks, for example
`configuration.php`, then press Space or Enter to apply the inline Code format. The backticks disappear. - At the start of an otherwise empty paragraph, type
```and press Enter to turn that paragraph into a Preformatted (<pre>) block. The fence disappears; use the Blocks menu to leave or remove the preformatted block when you are done.
These are typing conveniences, not a Markdown mode: Grafida still stores and publishes the article body as HTML.
Spell checking
Grafida uses your operating system's own spell checker, so misspellings are underlined as you type and suggestions come from the dictionaries your computer already has.
Suggestions appear in the native context menu, which you reach with Ctrl + right-click (Windows, Linux) or Cmd + right-click (macOS) — a plain right-click opens the editor's own menu instead.
Important
The spell-check language is an operating system setting; Grafida cannot override it. On macOS it lives in System Settings ▸ Keyboard ▸ Text Input ▸ Spelling. If it is pinned to one language, text in any other language is flagged wholesale; if it is set to “Automatic by Language”, only the languages enabled in that list are detected. Windows and Linux likewise defer to their own spell-check configuration.
Spell checking can be turned off in Settings. Turning it back on only marks text you edit afterwards, not the text already on screen — that is a limitation of the underlying web view.
The source code editor
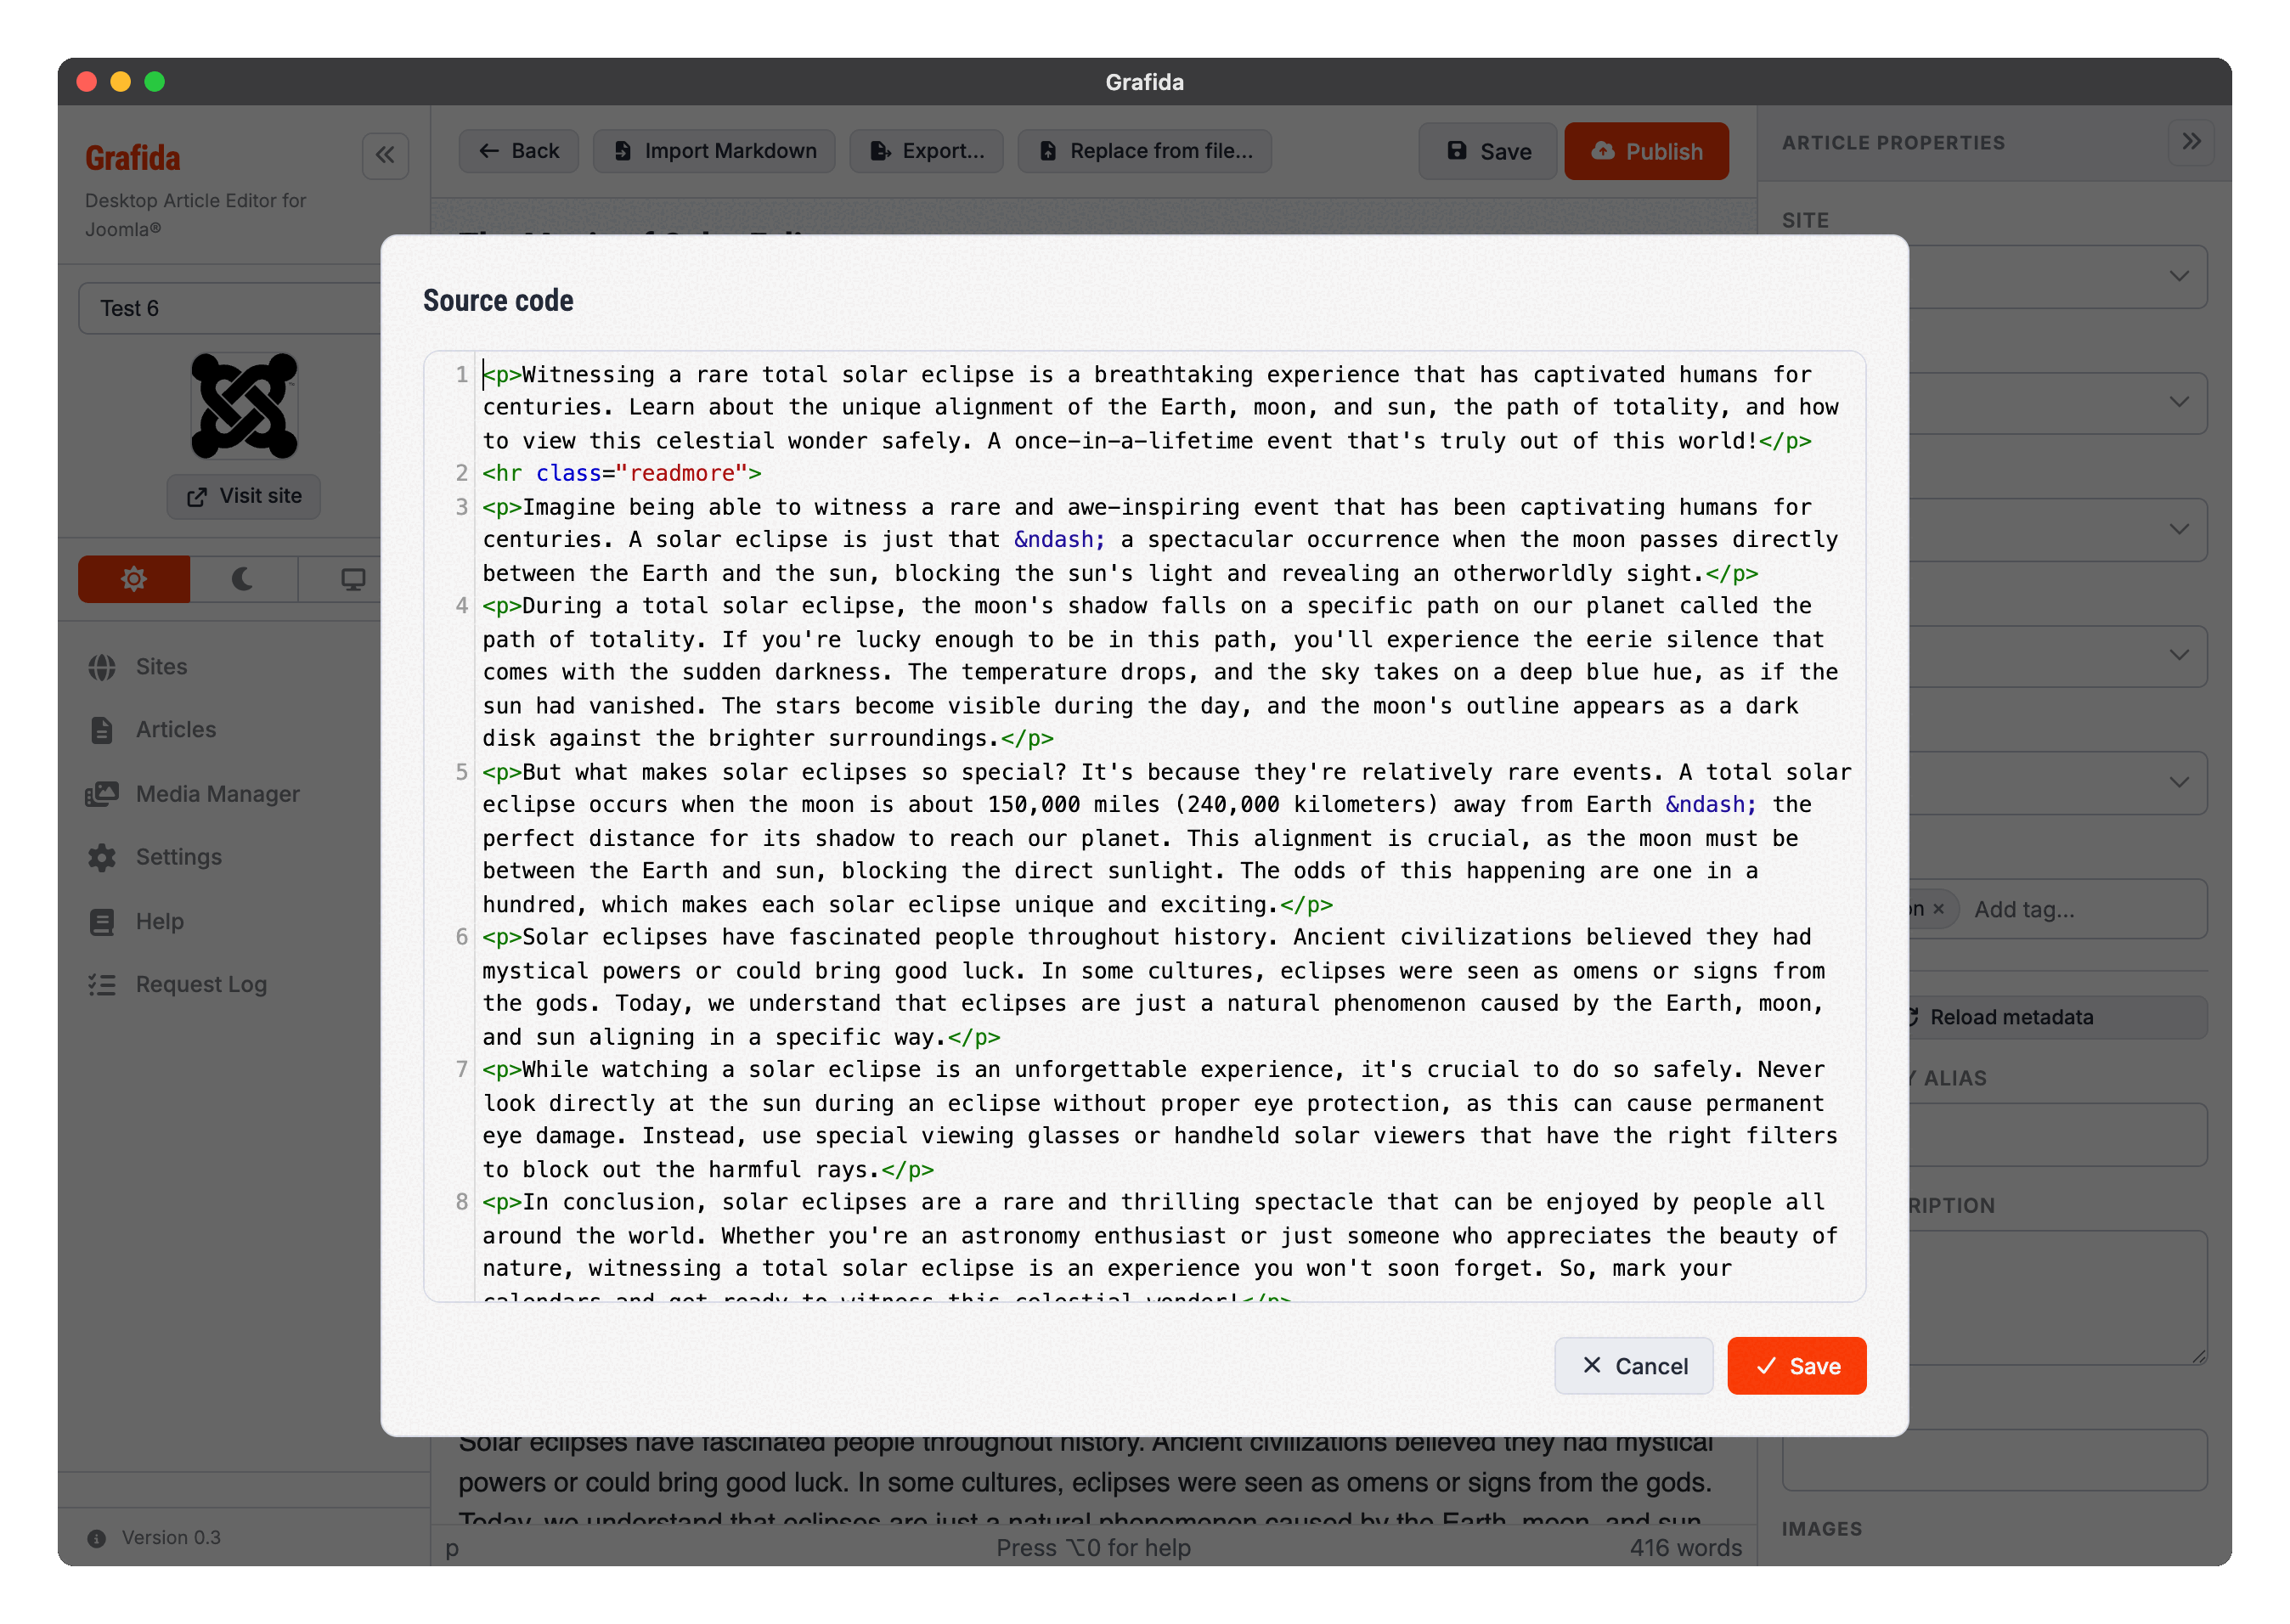
The <> toolbar button (also in the Tools menu, and in the slash-command menu) opens the article's
HTML in a proper code editor with syntax highlighting, bracket matching and search and replace.
| Action | Windows / Linux | macOS |
|---|---|---|
| Find | Ctrl + F | Cmd + F |
| Find next | Ctrl + G | Cmd + G |
| Find previous | Shift + Ctrl + G | Shift + Cmd + G |
| Replace | Ctrl + Shift + F | Cmd + Alt + F |
| Jump to line | Alt + G | Alt + G |
Saving the source code applies the whole change as a single undo step, so one Ctrl + Z in the editor takes you back to where you were.
How much the editor closes tags for you is a Settings option with three choices,
because the two halves of the feature are useful separately: finishing <p> can insert </p> for
you, and typing </ can complete the closing tag of whatever is open. See
Settings.
Keyboard shortcuts
Beyond TinyMCE's own shortcuts, Grafida adds a few. They are also listed in the editor's own Help dialog (Tools ▸ Help), on its Grafida tab.
| Action | Windows / Linux | macOS |
|---|---|---|
| Save the local article | Ctrl + S | Cmd + S |
| Open Settings | Ctrl + , | Cmd + , |
| Inline code format | Alt + Shift + C | Alt + Shift + C |
| Preformatted block | Alt + Shift + P | Alt + Shift + P |
| Blockquote block | Ctrl + Shift + Q | Ctrl + Shift + Q |
| Paste as plain text | Ctrl + Shift + V | Cmd + Shift + V |
Paste as plain text pastes in one keystroke, with every trace of the original formatting removed — no fonts, no colours, no bold, no links, no stray markup from the word processor or web page you copied from. Blank lines become paragraphs and single line breaks stay line breaks, and that is all you get. There is no mode to switch on first and no second Ctrl/Cmd
- V to follow it with.
This is not the same as the editor's Edit ▸ Paste as text menu item. That one is a switch: it turns plain-text pasting on and leaves it on for everything you paste afterwards, until you go back and turn it off again. The shortcut affects one paste and nothing else, so your next ordinary Ctrl/Cmd + V still keeps its formatting.
Note for macOS users: this shortcut is also what the system offers as Paste and Match Style in applications that have an Edit menu. Grafida has no menu bar, so before this shortcut existed the key combination did nothing but beep.
Images in the article body
There are four ways to get a picture into the article body.
- Paste or drag it straight into the editor.
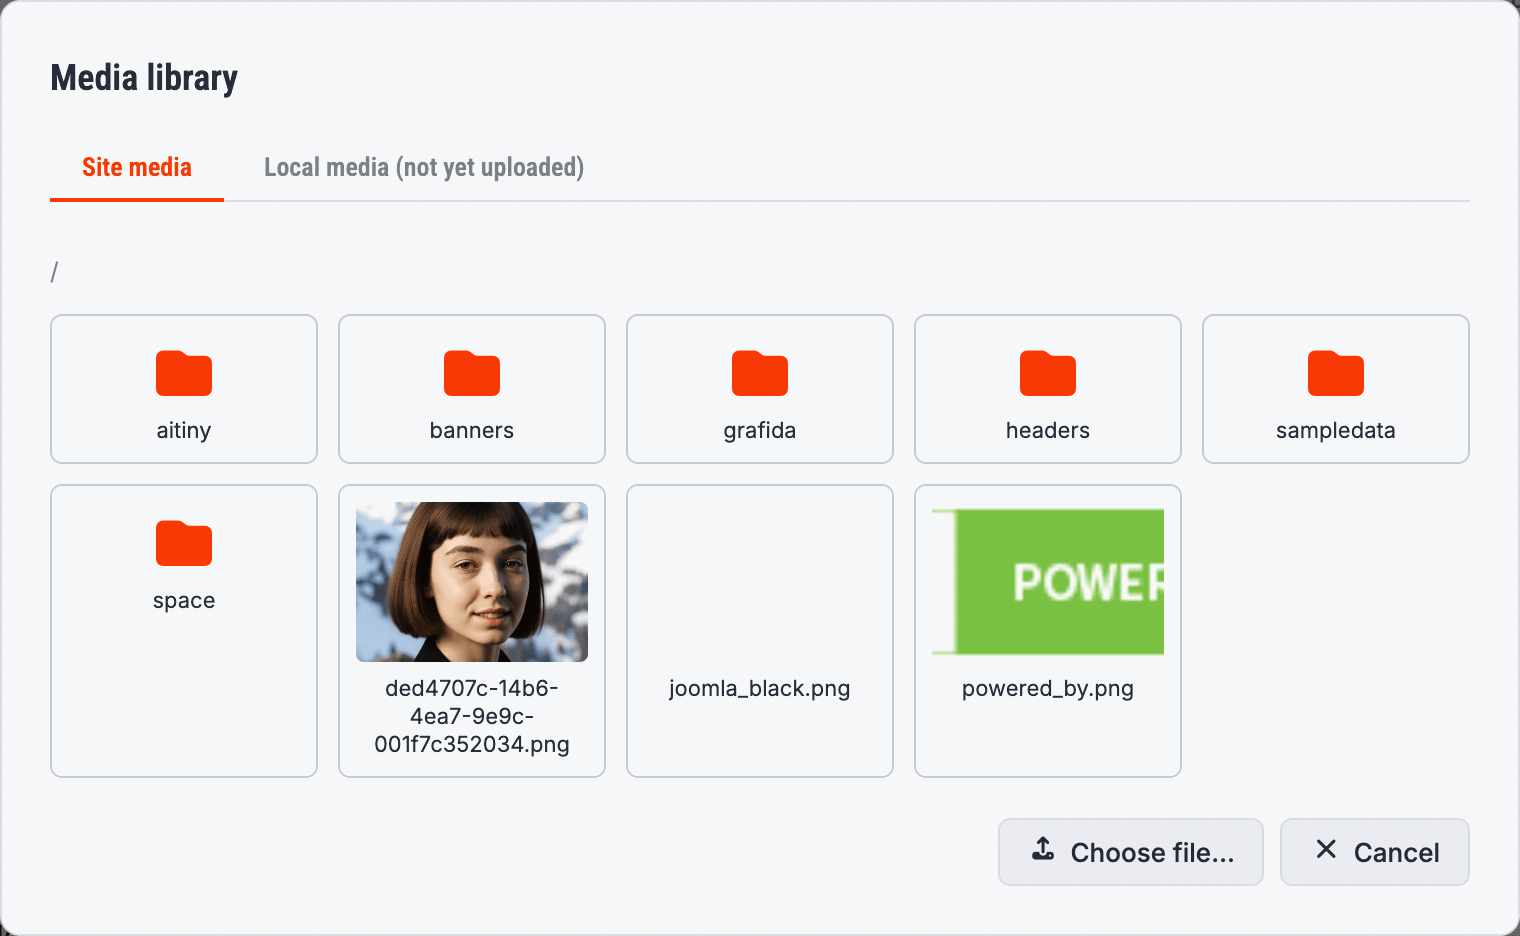
- Insert ▸ Image, then the browse button next to the Source field, and pick from your site's Media Manager.
- The same browse button's Local media tab, to reuse a picture you have already put into some other article but not published yet.
- The same browse button's Choose file… button, to pick a file from your computer.
A picture that is not yet on your site is kept inside Grafida until you publish. It is not uploaded when you insert it, and it is not embedded in the article's HTML either — so pasting a handful of screenshots does not turn your article into a multi-megabyte blob. On publish, every such picture is uploaded to your site's Media Manager and the article is rewritten to point at the uploaded copies.
Select an image in the article — or right-click it — and you get four extra actions:
- Image re-opens the Insert/Edit Image dialog (dimensions, description, alignment, and an Image is decorative checkbox that empties the alt text so screen readers skip it).
- CSS class… sets any CSS class on the image; the Insert/Edit Image dialog has no field for it.
- Edit image opens Grafida's crop / resize / rotate / flip editor on the picture itself. It is only available for a picture that is still local to Grafida.
- Reset size restores the image's
widthandheightto the picture's real dimensions.
Tip
The right-click menu is the reliable route. The floating toolbar only appears once the image is selected, and right-clicking an unselected image selects nothing.
Article properties
The sidebar on the right carries everything Joomla asks about an article other than its text.
Site is the site this local article belongs to. Changing it moves the article to another site; if it was linked to an article on the old site, that link is broken — Grafida warns you first.
Status is the state the article will be given when published: Published, Unpublished, Archived or Trashed. It is independent of the Publish button, which is a push, not a state change.
Category, Access, Language and Tags come from your site. Categories are shown as a
tree, with the same - indentation Joomla uses. The Tags field accepts existing tags and new
ones.
Reload metadata re-reads all of the above from the site. Your unsaved edits are preserved.
Custom Fields appear next, if your site has any that apply to articles. Just as in Joomla, you only see the fields the article's category uses — a field assigned to that category, to one of its parent categories, or to no category at all. Change the Category and the list changes with it; anything you had already typed into a field that belongs to another category is kept, so switching back and forth loses nothing. An article with no category set sees every field.
A field of type Media gets the same picture control the Intro image below it does: a preview, a Browse media… button that opens Grafida's media browser — either tab, so a picture already on your site or a local one that has not been published yet — a Clear button, an editable path, and the alt text with its Image is decorative checkbox. A local picture is uploaded to your site when you publish the article, exactly as an intro image is; until then it stays on your computer and the field works offline. Because Joomla stores the picture and the alt text together in one value, both are always written; clearing the picture clears the field.
Created by Alias is the by-line Joomla shows instead of the publishing account's name. Leave it empty to credit the account whose API token you are using.
Meta Description and Keywords are the article's SEO metadata.
Images — at the bottom — holds Joomla's Intro image and Full article image. For each one you can pick a file from your computer, browse your site's Media Manager, or paste a URL, and set its alt text, caption and CSS class. The Image is decorative checkbox empties the alt text and marks the picture so a screen reader skips it.
The Image URL box shows where the picture lives on your site. Pick one from your site's Media Manager and it shows that picture's path; leave the picture empty and you can type or paste an address of your own, which is what to do when your images are served from somewhere other than the Media Manager, a CDN for instance.
A picture chosen from your own computer has not been uploaded yet, so it has no address. Grafida
shows where it is expected to go — normally images/grafida/, or wherever the site's Upload
images to settings point — and the box is read-only, since the real address is only settled when
you publish and your site may choose a different one. The ⓘ button beside the label says so too.
Clear the picture if you would rather type an address by hand.
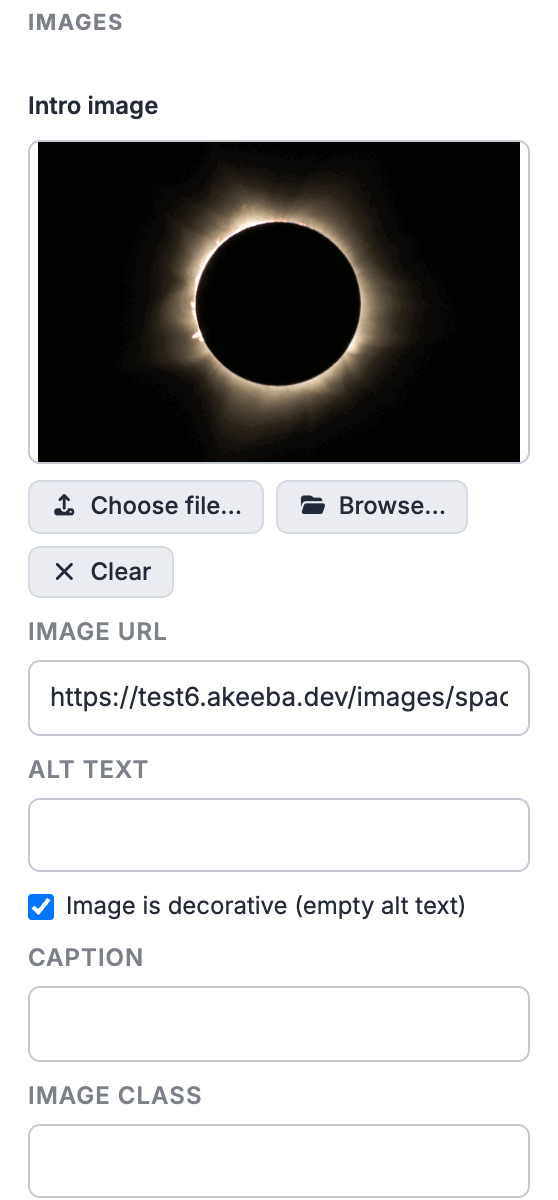
The Full article image block below it is identical.
Custom fields Grafida cannot edit
Grafida edits the common core field types: calendar, checkboxes, colour, integer, list, media, radio, text, textarea and URL. Anything else — editor, SQL, subform, user, user group list, image list — is listed as unsupported below the fields it can edit. Like the editable fields, this list only covers the article's own category.
A field Grafida cannot edit is normally harmless: Grafida simply does not send it, and Joomla keeps whatever value the article already had. It only becomes a problem when the field is required for the article's category, because Joomla then refuses to save an article that does not carry a value for it. Grafida stops before that happens and shows you a Publish blocked dialog listing the fields responsible. What it offers depends on whether it has a value to send:
- The article came from your site. Grafida read those fields' values when it opened the article, even though it cannot show them to you, so it can send them back unchanged. Publish anyway does exactly that.
- The article is new, or the fields are empty on the site. There is nothing Grafida could send, so Publish anyway is greyed out. Use Copy article HTML and finish the article in Joomla's back-end, or move it to a category that does not use that field.
Warning
Publish anyway restores the values Grafida read, which may no longer be current. Grafida cannot display these fields, so it cannot tell you whether someone has changed them on the site since you opened the article. If that is a real possibility, publish from Joomla's back-end instead.
Publishing
Publish sends the article to your site. In order, Grafida:
- uploads every picture in the article that is still local to Grafida, into the
grafidafolder of your site's Media Manager, and rewrites the article to point at the uploaded copies; - splits the article at the read-more separator into Joomla's intro text and full text;
- creates any tags that do not exist yet;
- creates the article, or updates the existing one if this local article is linked to one.
Every write records a note in Joomla's own version history saying it was made with Grafida and which version, so an editor looking at the article's history on the site can see where a revision came from.
Warning
A separate page or proxy cache may keep showing the old article after a successful publish. Joomla's article save clears the core content and article-module caches, including when Grafida saves through the Web Services API. It does not purge full pages stored by the System - Page Cache plugin, and Joomla has no core Web Services endpoint Grafida can call to clear that cache. The same limitation applies to caches outside Joomla, such as a CDN, reverse proxy, hosting cache or third-party cache extension. If the public page stays stale, clear that cache from Joomla or its provider, or configure it with a suitable lifetime or an API-aware purge rule.
Note
If the site rejects the article, it is usually the custom fields. Grafida checks your article against the field definitions it last read from the site, so a field added, renamed or made required since then is invisible to it. When that happens Grafida shows you the site's own error message and offers Reload metadata; press it and publish again.
Afterwards, Grafida asks what to do with your local copy:
- Delete Local Article removes it from your computer and takes you back to the list. The article remains on your site, and shows up in the Remote articles tab.
- Keep Local Article leaves the editor open so you can keep working and publish again.
Note
Publishing does not change the article's status on your site by itself. The Status field in the properties sidebar is what decides whether the article ends up published or not.
Moving an article between computers
Export… writes the article to a .grafida file: a single, plain-JSON file holding every field
you can see, the saved AI chats, and any pictures you have used but not yet published. It
deliberately does not carry the site it belonged to, or the ID of the remote article it mirrored
— those mean nothing on another installation.
Because the underlying window toolkit has no “Save as” dialog, Grafida asks you for a folder and names the file after the article's alias.
There are two ways back in:
- Import from file… in the Articles view creates a brand-new local article on the active site.
- Replace from file… in the editor overwrites the article you have open, keeping its link to the site and to the remote article.